The Awesome Forms feature allows the App Admin to create various types of forms. The forms include simple Contact Us forms, to more complicated forms such as Mortgage Calculators, Grade Conversions,Inventory Managers, and more!
The data from the forms is easily searchable, sortable, and editable directly in the app. App Members can access and edit their data only. The App Admin can see combined or individual data sets from App Members. App Admins also have additional options such as exporting the data, and receiving the data via email.
In addition to a general overview, this documentation will provide you with instructions on creating a simple form, and a complex form. Creating both types of forms will enable you to learn the ins-and-outs of the Awesome Forms feature.
Main Settings

Upon accessing Awesome Forms you will see 3 tabs. Manage Fields, Manage Data and Settings.
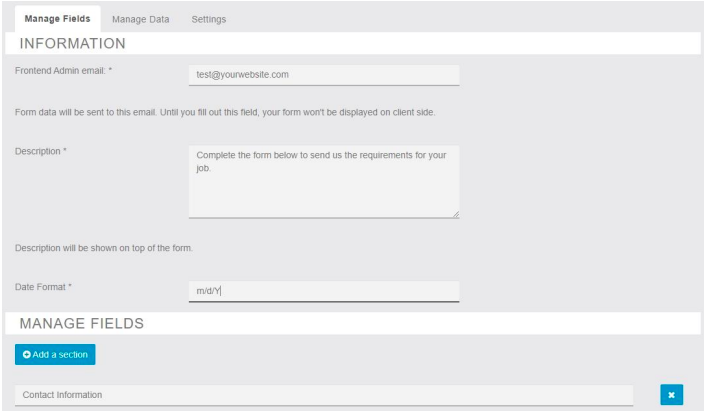
MANAGE FIELDS
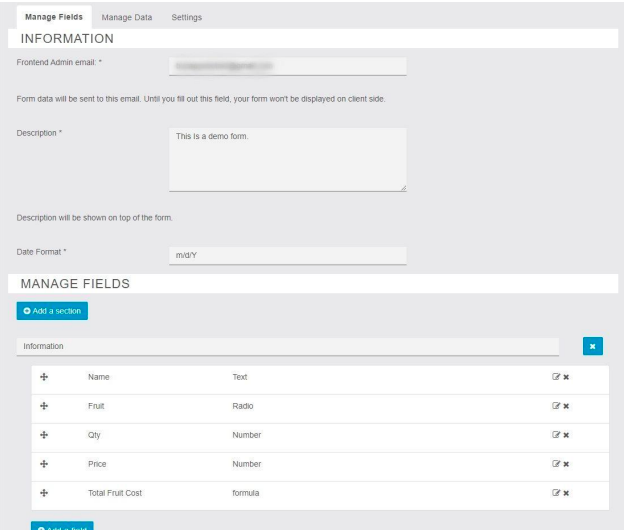
The Manage Fields section is where you add all of the Fields for your app and to set the general settings for
the respective form.
- FRONTEND ADMIN EMAIL – The email address that the form data should be emailed to.
- DESCRIPTION – The general purpose/description of the form as seen by the App Users.
- DATE FORMAT – Select if you want your date format displayed as MM/DD/YYYY or DD/MM/YYYY
- ADD SECTION – Use this function to separate your Form into different sections (ie Categories).
- ADD FIELD – Click this button to add a field to your form. Upon clicking the button, you will then be given options to give the Field a name, and select the options for the Field, and to select the Field Type.
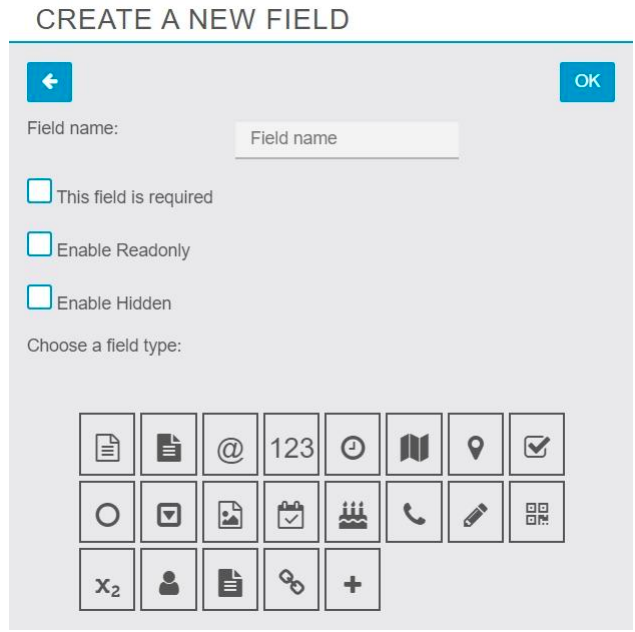
- Field Name – The frontend name that the App User will see. This will explain to the App User the type of information that should be entered in this section/field of the form.
- This Field Is Required – Select this option if the App User must enter data for the respective field.
- Enable Readonly – Use this option if you do not want the App User to be able to edit the field. This option is useful for fields that contain calculations.
- Enable Hidden – This option will hide the field from the App User. This is another option that is useful for fields that contain calculations. Often, you may not want the App User to see fields that are calculating data that is entered on the form. In these cases you would use this option.
Available Field Types
Below is breakdown of the various field types available to you.

Use this field for email addresses.

Number
This should be used when only numbers should be entered.
This field also works with the Formula field.

Date/Hour
Use this field for Date and Time entries

Geolocation
Location stamp field when you need to capture the location of the App User.

Address
Use this field if you want the App User to enter an address, and have the form to retrieve the longitude and latitude information (for the entered address).

Checkbox
Useful for Yes/No option fields.

Radio
Use the Radio field when you need to capture more than one option for a question.

Drop-Down
This Field type should be used when you want the App User to select from a list of
options.

Image
The Image field enables the App User to upload a picture to your Form.

Anniversary
A Date field but without the Time.

Birthday
A Date field but without the Time.

Phone
A Phone Number field that adds the country code.

Signature
Enables App Users to obtain a signature on the Form.

Bar/QR Code Reader
Enables the App User to scan barcodes and QR codes.

Formula
Enables you to perform calculations on the Form based on inputs from the App User. A
detailed explanation of this feature is explained further in this documentation.

My Account
When using this field type the App User’s Name and Email address is automatically
added to the Form and can’t be edited. When using this field type, do NOT select any of the available field type options.

Click Wrap
This field type enables the App Admin to add Privacy Policy or Terms of Service document to a form that the App User must agree.

Hyperlink
The Hyperlink field type enables the App User to enter a url.

Auto Increment
This field type enables the App Admin to add an “ID” type field to a form that will
automatically increase in number. A detailed explanation of this feature is explained further in this documentation.
After selecting the Field type, click OK to save your choices.
MANAGE DATA
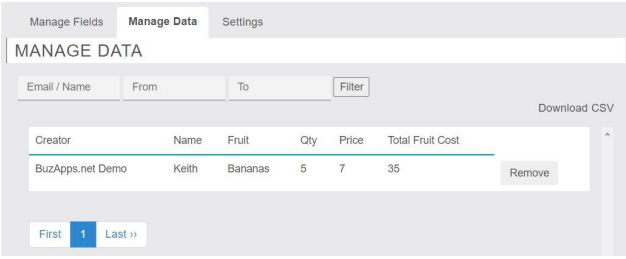
The Manage Data section enables you to to download your data, and/or to remove submitted records of data.
You can Filter the data by entering an Email or Name. You can also filter the data by using From and To date Fields.
To Download the data, simply click the Download CSV button on the right-hand-side of the screen. When downloading the data, it would be useful to see our instructions on opening the CSV file.
If you want to Delete a Record, click the Remove button to the right of the record.
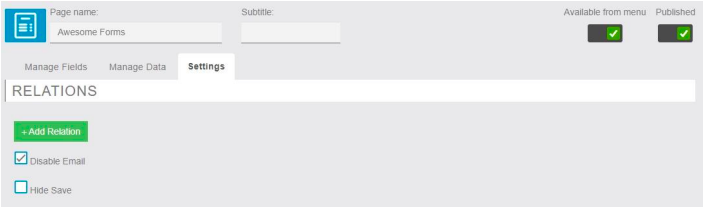
SETTINGS
ADD RELATION – This function is currently disabled (works with a future addition to Awesome Forms).
DISABLE EMAIL – If this feature is enabled, upon the App User submitting their form, the results will not be emailed. This option is useful for calculator type forms, etc where the App Admin don’t need the results of the form submissions.
HIDE SAVE – If enabled, then the form record can only be submitted. There won’t be an option for the App
User to save the record and make continuous changes.
FORMULA FIELD TYPE
As previously mentioned, the Formula field type enables the App Admin to perform calculations on the Form based on inputs from the App User. Below are form and formula examples to help you better understand how to utilize this field type.
TIP CALCULATOR (SIMPLE FORM)
For this example, we’re going to create a very simple Tip Calculator Form.
1) If not already, add the Awesome Forms feature to your app.
2) Since we are creating a Tip Calculator form, we don’t want the form submissions to be emailed to the App Admin. That said, click the Settings tab, then check the option for Disable Email, and click Save.
3) Click the Manage Fields tab, and complete the Description field, add Meal Information to the Add A Section field, and add an email address to the Frontend Admin email field.
4) Click the Add a field button, and make the following selections below. The App User will enter the total amount for the meal in this field.
● Field Name: Meal
● This field is required: Yes
● Field Type: Number
● Click OK to Save
IMPORTANT NOTE: Since we’re going to use the Meal field as part of our calculations, it’s important that
we set this Field Type to Number.
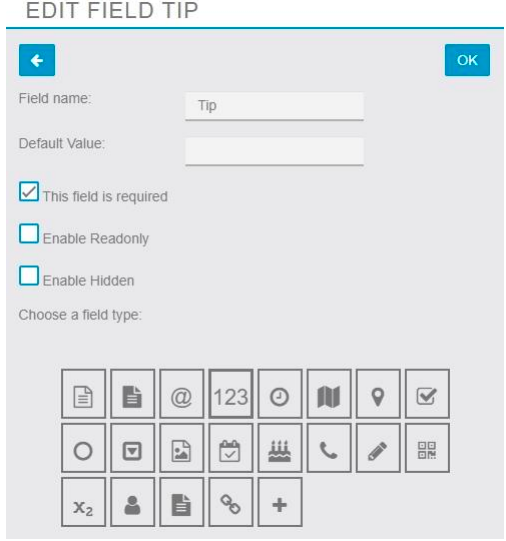
5) The App User will use this next field to enter the tip percentage that they want to give. Since we’re calculating a percentage (%), we want to leave an example of the entry that should be made for the App User.
Click the Add a field button, and make the below selections:
● Field Name: Tip
● This field is required: Yes
● Field Type: Number
● Click OK to Save
IMPORTANT NOTE: As before, since we’re going to use the Meal Total field as part of our calculations, it’s
important that we set this Field Type to Number (and the field name cannot contain spaces).
6) We’re now going to add a Formula field that will calculate our two previously created fields. We don’t want the App User to enter any data into this field so we’re going to make it read-only.
In addition, since the fields that are going to be used in calculations cannot have spaces, we’re going to use an underscore (_) in the formula (In our next field, we’re going to use the Tip_Amount in a calculation as
well).
*** Field Name can have spaces and when used in formula space will be replaced with underscore . ( We have used underscore in field name in screenshot below as it was not supported in old version, you can use Space in field name and use underscore for same field while writing formula)
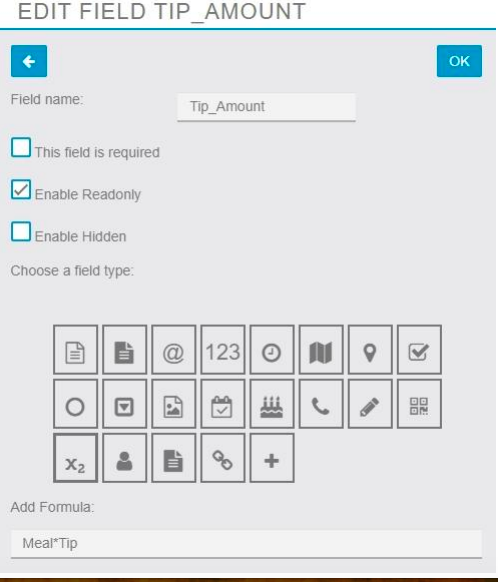
Click the Add a field button, and make the below selections.
● Field Name: Tip_Amount
● Enable Readonly: Yes
● Field Type: Formula
● Add Formula: Meal*Tip
● Click OK to Save
IMPORTANT NOTE: In the Add Formula settings, we’re simply telling the system the calculations that we
want it to make. So in this case, we want it to multiply the Meal input and the Tip input.
When entering the formula, do not put spaces in your formula. See the below screenshot.
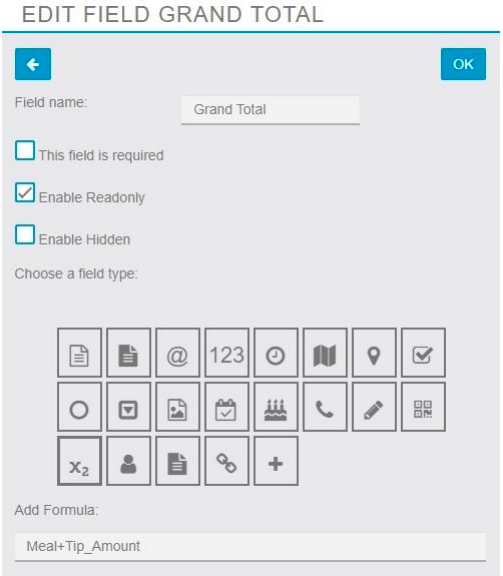
7) Now that we have a field that is going to calculate the total amount of the Tip. We’re now going to add a field that will calculate the Grand Total (the Tip amount plus the Meal amount).
Click the Add a field button, and make the below selections:
● Field Name: Grand Total
● Enable Readonly: Yes
● Field Type: Formula
● Add Formula: Meal+Tip_Amount
● Click OK to Save
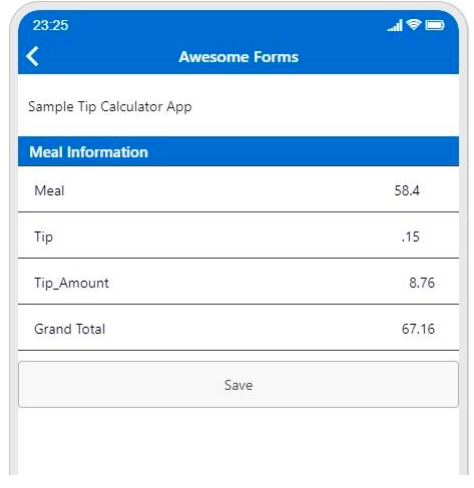
8) Below is a screenshot of the form in the app:
JOB ESTIMATOR FORM (COMPLEX FORM)
For this example, we’re going to create a Job Estimator form that utilizes more advanced formulas.
1) If not already, add the Awesome Forms feature to your app.
2) Click the Manage Fields tab, and complete the Description field.
Next, add a Contact Information to the Add A Section field, and add an email address to the Frontend Admin email field.
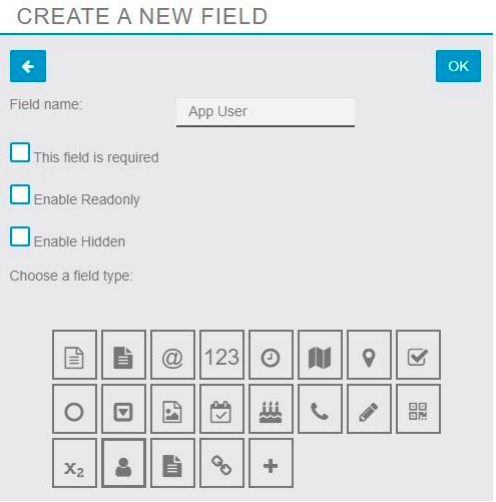
3) We’re going to use the App User field type to make this form so that it will automatically capture the Name and Email Address of the App User that’s submitting the Report.
Click the Add a field button, and make the following selections below.
● Field Name: App User
● Field Type: Account
● Click OK to Save
IMPORTANT NOTE: When using the Account field type, it’s important that you do NOT select any of the field options (not even the required option).
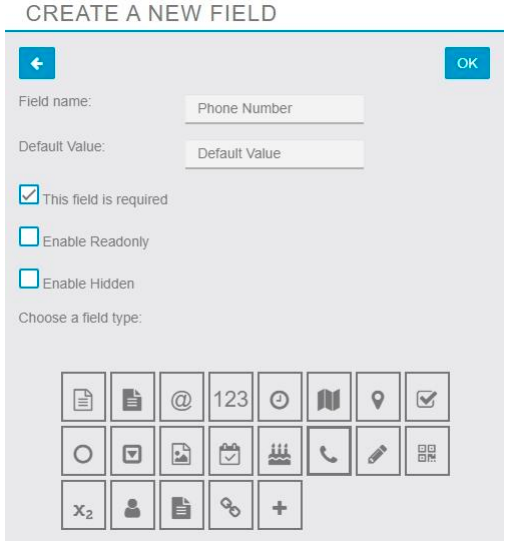
4) We also want to capture the Phone Number of the App User. Add a new Field with the following requirements:
Click the Add a field button, and make the following selections below.
● Field Name: Phone Number
● This Field Is Required: Yes
● Field Type: Telephone
● Click OK to Save
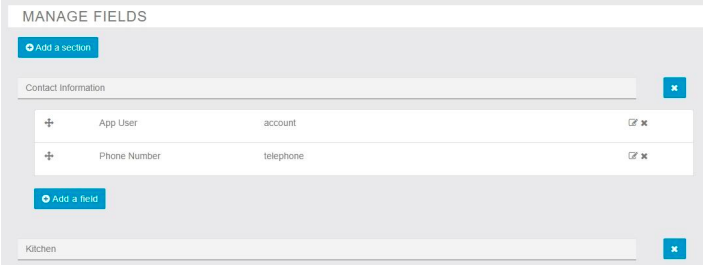
5) Our form is going to contain a few Sections to help keep the form neat and professional. Click the Add a Section button to add a new Section. Name the Section Kitchen.
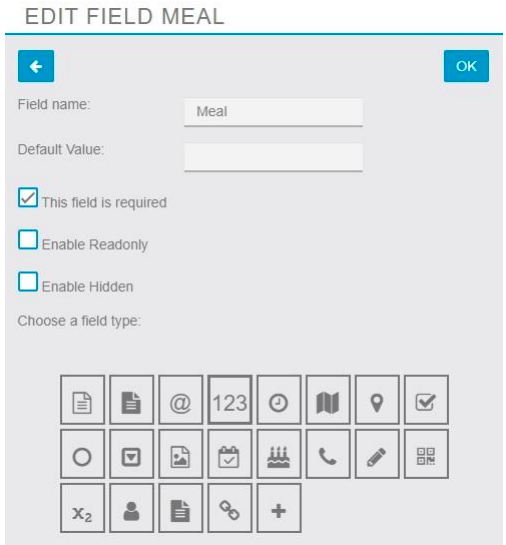
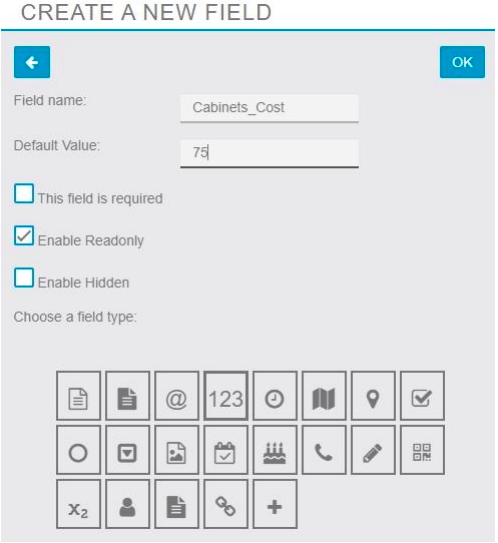
6) Let’s display the cost of a Cabinet. Since we simply want to display the cost and not accept input, we’re going to add a default entry, and make the field read-only so that the App User cannot edit the field.
While in the Kitchen section, click the Add a field button, and make the following selections below.
● Field Name: Cabinets_Cost
● Default Value: 75
● Enable Readonly: Yes
● Field Type: Number
● Click OK to Save
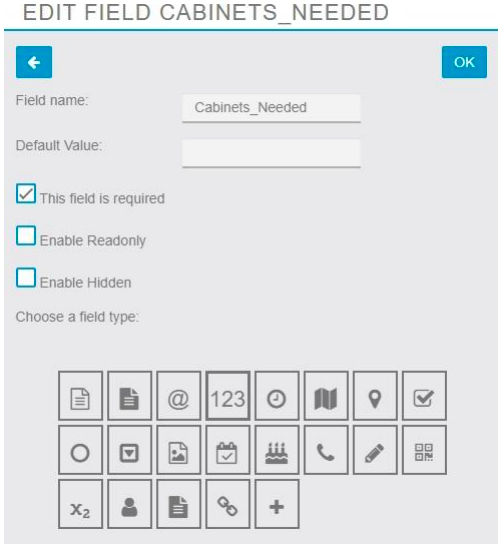
7) Our next field is going to allow the App User to enter the number of Cabinets that they need (qty).
While in the Kitchen section, click the Add a field button, and make the following selections below.
● Field Name: Cabinets_Needed
● Field Type: Number
● This Field Is Required: Yes
● Click OK to Save
8) Now that we have the Cabinet Cost and the Qty (Cabinets Needed), let’s use a Formula field type to create a SubTotal field. We’re going to multiply the Cabinet Cost by the Cabinets Needed.
While in the Kitchen section, click the Add a field button, and make the following selections below.
● Field Name: Cabinets_SubTotal
● Field Type: Formula
● Enable Readonly: Yes
● Add Formula: Cabinets_Cost*Cabinets_Needed
● Click OK to Save

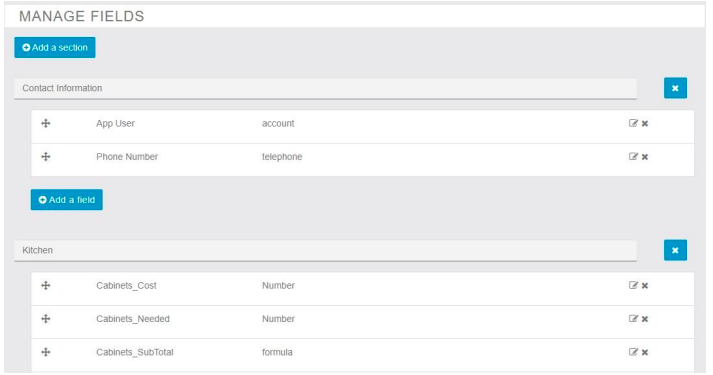
So far, this is what our form looks like:
9) The basics are done… Now it’s time for us to get creative!
We’re going to add a Formula field that’s going to give the App User a message based on the number of Cabinets that they request. To calculate this variable, we’re going to use an IF Statement in the Formula field using text.
If they order less than 5 Cabinets, we’re going to let them know to Order More Than 4 to earn a discount.
If they order more than 4 Cabinets, we’re going to inform them that the Discount Is Applied.
While in the Kitchen section, click the Add a field button, and make the following selections below.
● Field Name: Cabinets_Discount
● Field Type: Formula
● Enable Readonly: Yes
● Add Formula: IF(Cabinets_Needed<5,’Order More Than 4′,’Discount Applied’)
● Click OK to Save
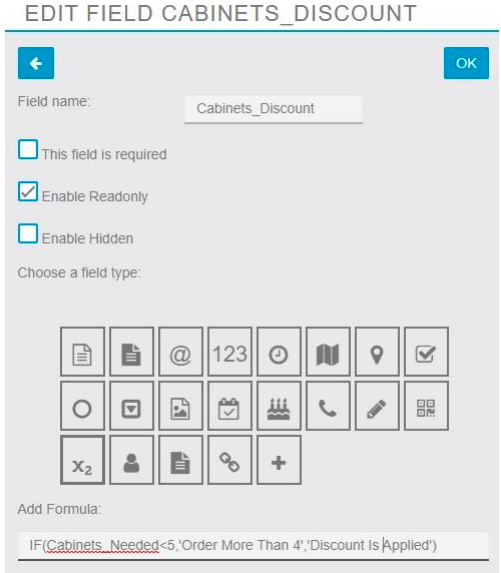
IMPORTANT NOTE: When using the IF Statement in the Formula field type, you must put prime symbols before and after your text message.
10) Now to calculate the Discount Percentage on the Cabinets, we’re going to use an IF Statement in the Formula field type using numbers.
If they order less than 5 Cabinets, we’re going to let them know that the discount is 0.
If they order more than 4 Cabinets, we’re going to give them a .05 (5%) discount.
While in the Kitchen section, click the Add a field button, and make the following selections below.
● Field Name: Cabinets_Discount_Rate
● Field Type: Formula
● Enable Readonly: Yes
● Add Formula: IF(Cabinets_Needed<5,0,.05)
● Click OK to Save

IMPORTANT NOTE: When using the IF Statement in the Formula field type, do not put a prime symbol around the number as you would with text. However, if the number has a decimal in it, then you have to use prime symbols around the number. In the above example, the whole numbers do not have prime symbols but the decimal contains a prime symbol.
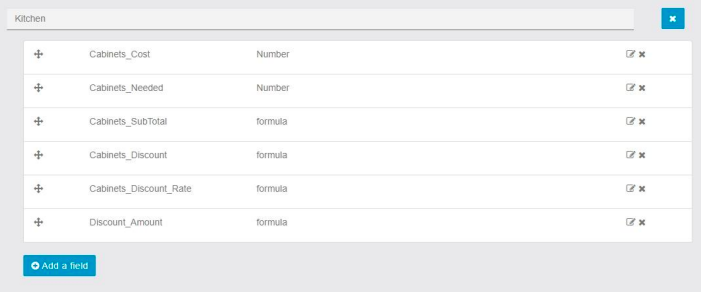
So far, our Cabinets section looks like this:
11) Since our Customer could potentially order a large number of Cabinets, we need to factor in the Shipping Rate. To calculate this, we’re going to use an IF Statement that can calculate multiple variables.
Using the formula, we’re going to be able to get a Shipping Rate based on multiple possible inputs by the App User. The higher the quantity of Cabinets needed, the higher the Shipping Fee.
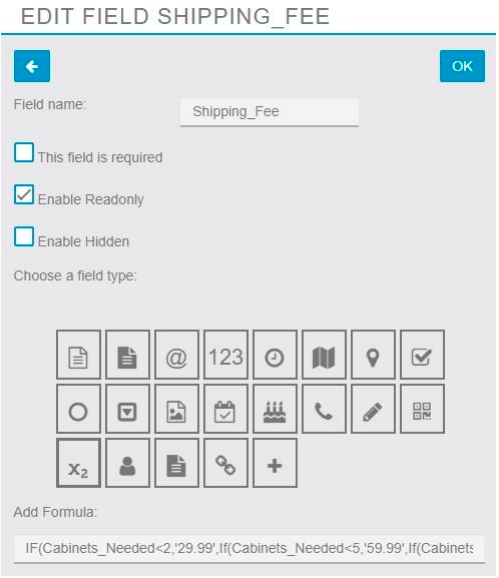
While in the Kitchen section, click the Add a field button, and make the following selections below.
● Field Name: Shipping_Fee
● Field Type: Formula
● Enable Readonly: Yes
● Add Formula:
IF(Cabinets_Needed<2,’29.99′,If(Cabinets_Needed<5,’59.99′,If(Cabinets_Needed<13,’99.99′,If(Cabinets_Needed>13,’199.99′,0))))
● Click OK to Save
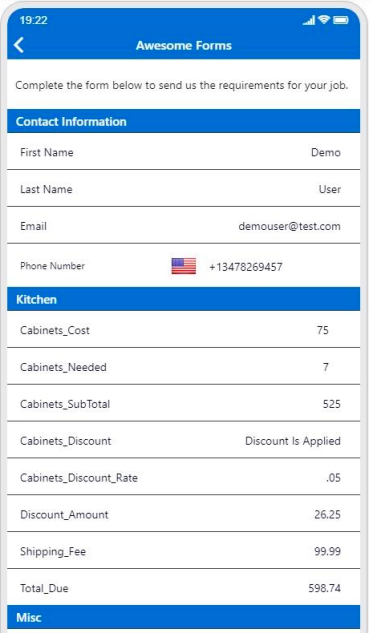
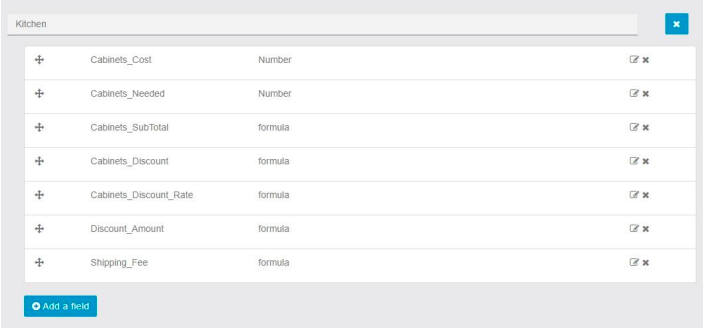
At this point, this is what our form should look like:
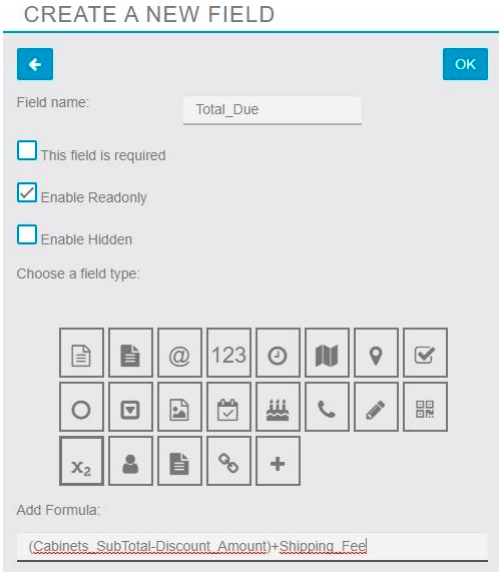
12) It’s now time to get our Total Due. To calculate the Total Due, we need to first subtract the Discount Amount from the Cabinets SubTotal, then we add the Shipping Fee.
While in the Kitchen section, click the Add a field button, and make the following selections below.
● Field Name: Total_Due
● Field Type: Formula
● Enable Readonly: Yes
● Add Formula: (Cabinets_SubTotal-Discount_Amount)+Shipping_Fee
● Click OK to Save
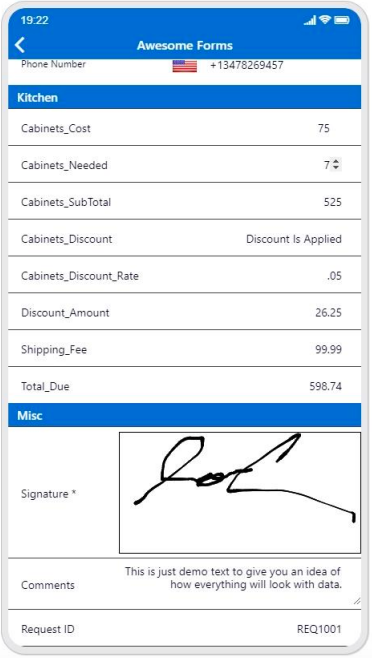
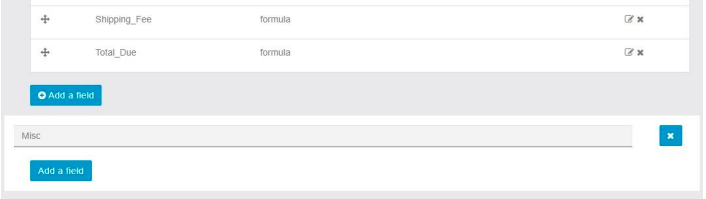
13) We’re just about done. Let’s add our final section to our form for the last few fields. Click the Add a Section button to add a new Section. Name the Section MIsc.
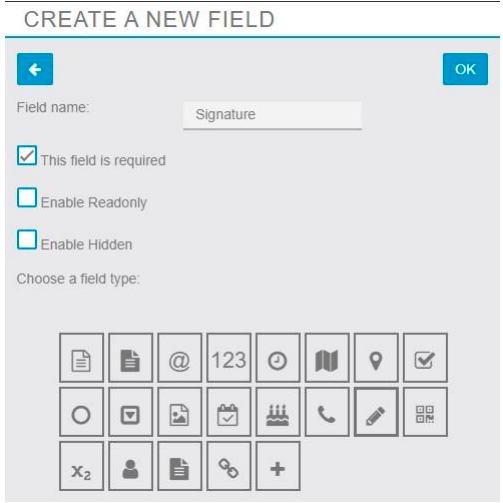
14) We want the App User to sign the form so we’re going to add a Signature field type.
While in the Misc section, click the Add a field button, and make the following selections below.
● Field Name: Signature
● This Field Is Required: Yes
● Field Type: Signature Pad
● Click OK to Save
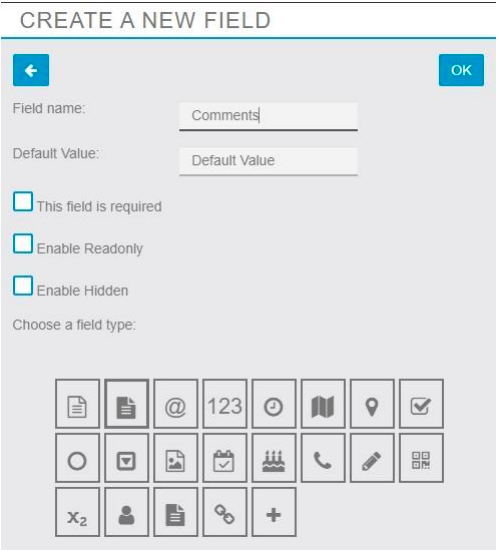
15) Let’s add a Comments field so that the App User can send additional notes if necessary.
While in the Misc section, click the Add a field button, and make the following selections below.
● Field Name: Comments
● Field Type: Multiline Text
● Click OK to Save
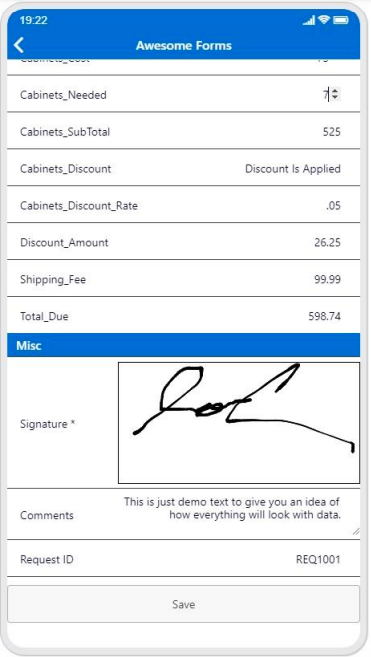
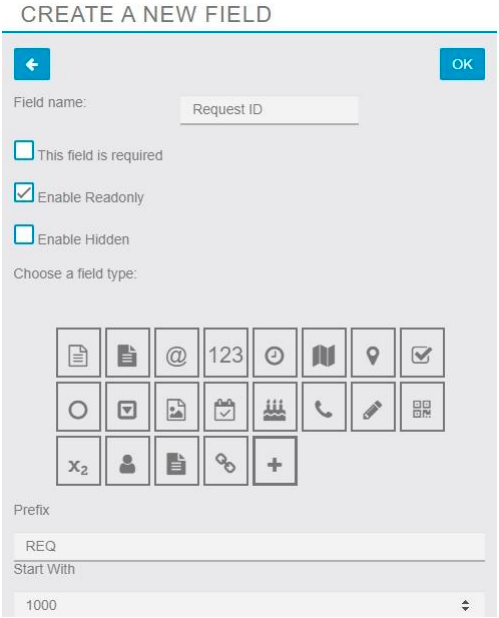
16) Lastly, we want to give each submission it’s own unique ID. For this, we’re going to utilize the Auto Increment field type. In addition, we want to prefix each ID with REQ, and want the records to start with 1000.
While in the Misc section, click the Add a field button, and make the following selections below.
● Field Name: Request ID
● Enable Read Only: Yes
● Field Type: Auto Increment
● Prefix: REQ
● Start With: 1000
● Click OK to Save
NOTE: Ideally, you would probably also add the following fields to the form: Address (for the service location) and Image (in case the App User wanted to send you pictures of their ideas, etc). For training purposes, we’ll stop here.
16) Below are screenshots of the form in the app.