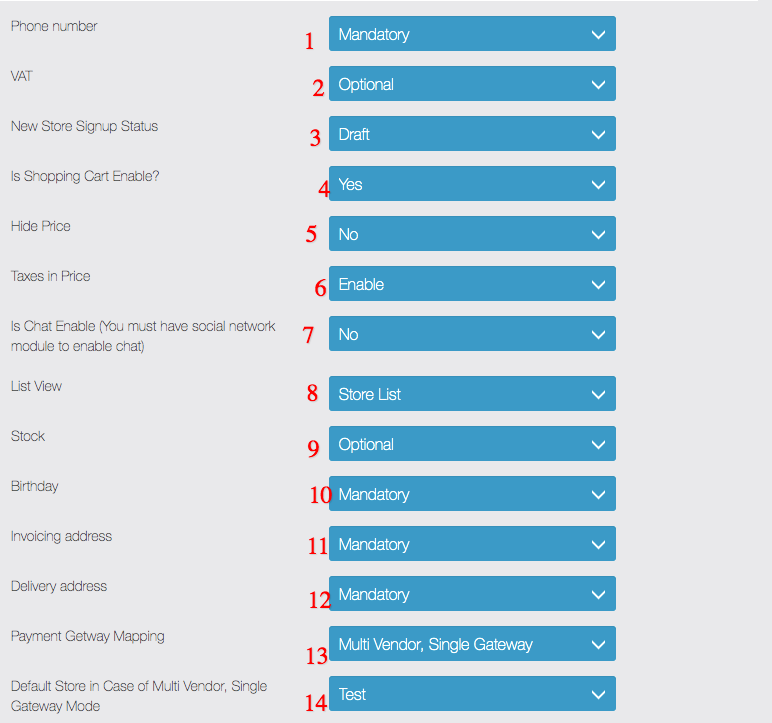
Phone Number field can be enabled to be captured in checkout flow and you can mark it optional/mandatory for customer to place the order.
VAT field can be enabled to be captured in checkout flow and you can mark it optional/mandatory for customer to place the order.
New Store’s default status, this is important when you allow store signup from app via marketplace module. Draft – Hidden to customers in app , Published – Visible to all customers
You can Enable/Disable shopping cart functionality , if disabled it wont show add to cart button in the app , good option if you want to use commerce pro for just catalog, ads, business listing purpose
You can hide price from the app in case you are using this as business listing or something similar purposes.
If enabled taxes are included in product price
You can enable buyer/seller chat in your app , you need to have Social Network Module installed to make this functionality work.
You can change first page of commerce pro feature, this is very important setting which changes complete UI and Flow for your customers, it has four options
Category List View – if selected first page of commerce pro will show all the categories first and then sub categories and then product can be seen/added to cart. can be used when you have single store with multiple categories.
Product List View – This options shows all the products first. can be used when you have many products and no categories.
Store List View – Search form will be displayed first and then Store information will be displayed , this is useful when you want to do hotel booking flow.
Map List View – This settings is important when you want to show all your stores on maps first and recommended for multi store setup only as you want to show nearest stores to user on map and then clicking on stores icon takes customer to stores product info page. Can be used for directory listing etc
If stock is enabled order can not be places if you don’t have products in stock and you need to input stock available in edit section of all the products.
Birthday field can be enabled to be captured in checkout flow and you can mark it optional/mandatory for customer to place the order.
Invoicing address related fields can be enabled to be captured in checkout flow and you can mark it optional/mandatory for customer to place the order.
Delivery address related fields can be enabled to be captured in checkout flow and you can mark it optional/mandatory for customer to place the order.
Payment Gateway mapping is important based on your store setup, Commerce Pro setup supports Single Store Setup , Multi Store Setup or Marketplace Mode, in different mode you want to transfer funds to different accounts, it allows 3 options.
Multi Vendor ,Single Gateway – In those mode you will have multiple stores but payment gateway will be used from one default store settings, you need to mention which is default store in point 14 option.In this mode order can be placed for products from single/multiple stores. for this mode it’s recommend to set List View as Store List View , see point 8 .
Multi Vendor , Direct Transfer to Store – in this mode you will have multiple stores and payment gateway settings will be used from each individual store, so amount collected will be transferred to store owners gateway/account. Default Store settings form point 14 will be ignored in this mode. In this mode order can be placed for single store product only. for this mode it’s recommend to set List View as Store List View , see point 8 .
Single Vendor , Multi Store – in this mode all stores are owned by one merchant , it’s for chain of restaurants etc, it also allows each store to use their own gateway but on store page in checkout allows user to choose stores from list, in above two modes we don’t allow user to switch/choose any store in checkout page. In this mode order can be placed for products from single/multiple stores.
Default store is settings decide which stores payment gateway settings will be used in Multi Vendor ,Single Gateway mode.
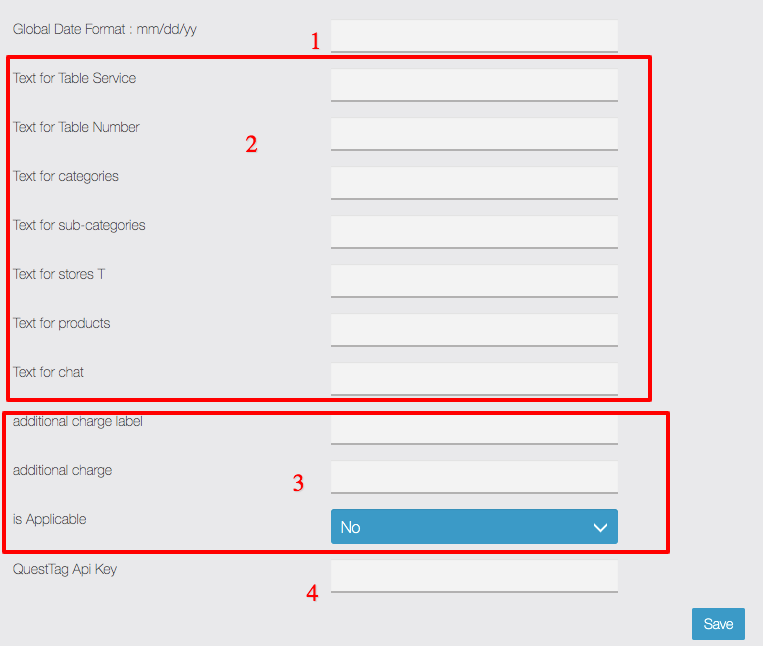
You can change date format to be used in order email/list section etc.
Various settings to change label to use commerce Pro for different purposes example changing Table service to Umbrella Service / Employee code etc, and instead of products you can call it ads, business etc this gives huge flexibility to use this module many use cases of directory listing ,food, commerce etc
This setting allows you to add service fee to cart and you can give it any label and enter any amount to be charged and mark it applicable(Yes) to be added to cart on each orders automatically, it can be used for setup fee/delivery fee/any other fees you want to charge everyone.
You can enable driver tracking using QuestTag service which is free for 1000/orders/month and nominal fee after that. You just have to signup and copy past api keys and once you change order status to Shipped it will automatically send order data to QuestTag app and you can assign driver and customer will get sms and will be able to see the realtime location of driver and order status. QuestTag provides free App for driver and customer does not need any app they will be able to see driver location from a link sent via sms. This makes your delivery system more transparent
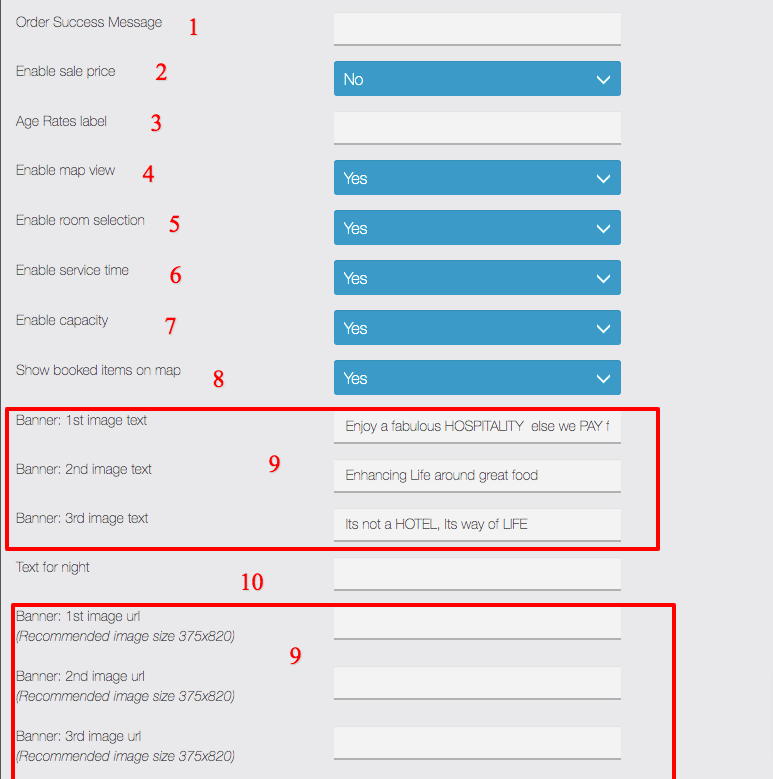
Order Success message is displayed after order is successfully places
If sale price is enabled product add/edit page will have option to enter discounted price and will be visible on app side.
Age Rates label shows custom text when additional charge for age group is added
Enable map view will allow user make booking via map designed page example umbrella booking, seat map booking etc
If room selection is enabled – it will allow user to choose room while searching room in hotel booking flow and disabling will hide it from app see screenshot
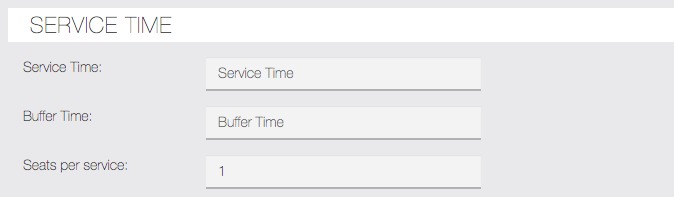
If Service Time is enabled, the setup will be used for appointment and Classes and checkout date won’t be asked as this will enable session booking for service. You will have additional option in product edit to enter session duration and capacity.
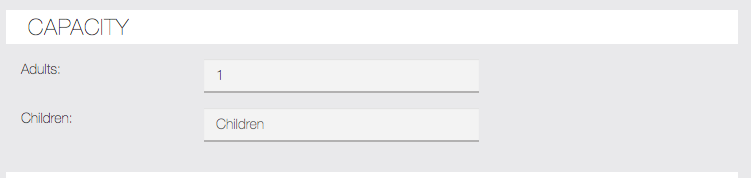
If capacity is enabled , you will have option to enter adult and child capacity in product add/edit page, it’s used in hotel booking scenario keep it disabled for other use case.
If Booked Items on is enabled – on map designer booking flow from app, it will display all the booked accommodation too, to hide booked accommodation from keep it disabled.
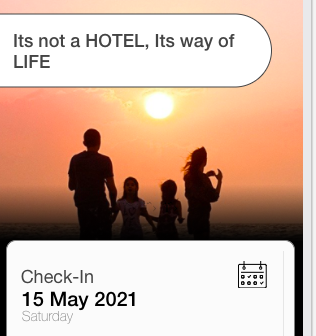
Banner text and Image can be changed from here
Some pages we show price /night , in case of appointment you would like to change it /session /class etc, use this settings to customise it
You can add discount code here, which cane be used by customer in cart , please enter all the information asked in form while creating coupon code.
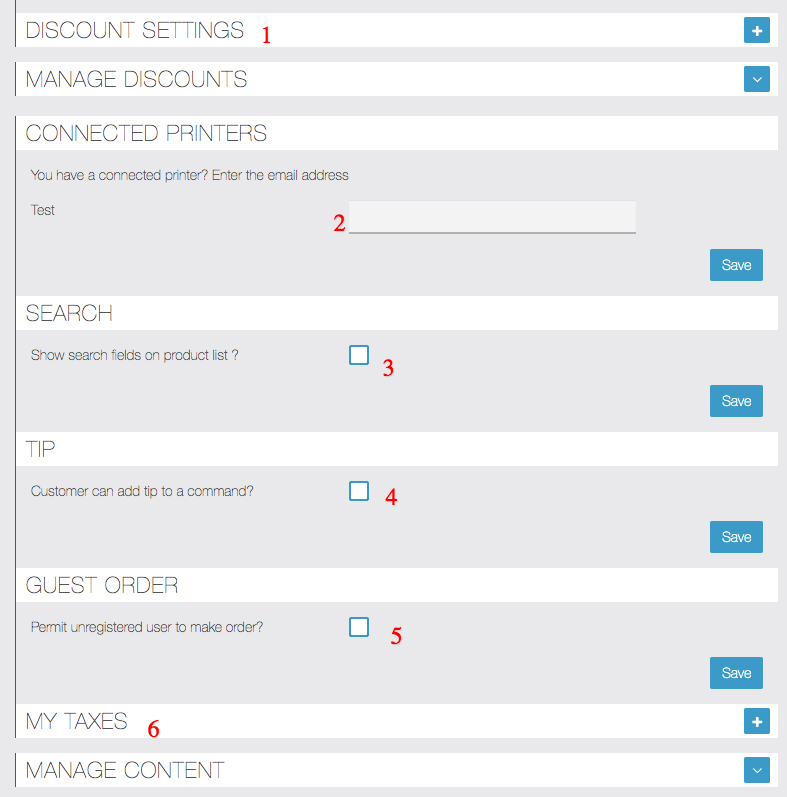
You can enter printer email for each store to print receipt.
You can enable search functionality from here
Will allow customer to add tip
You can allow customer to place order as Guest user without creating any account.
You can manage tax slab rates from here and then select in product edit page
How can we help?
on Combo Modules Purchase
20%
20%
on renewal
of expired
license
20%
20%
on renewal of active
license
20%
40%
on renewal of combo active license
60%
Notes: No coupon code is required. Applied automatically on the cart. Combo offer is applicable on the purchase of 2 or more modules/renewal/both. Terms and conditions apply.